
Autodesk • 2024 Internship
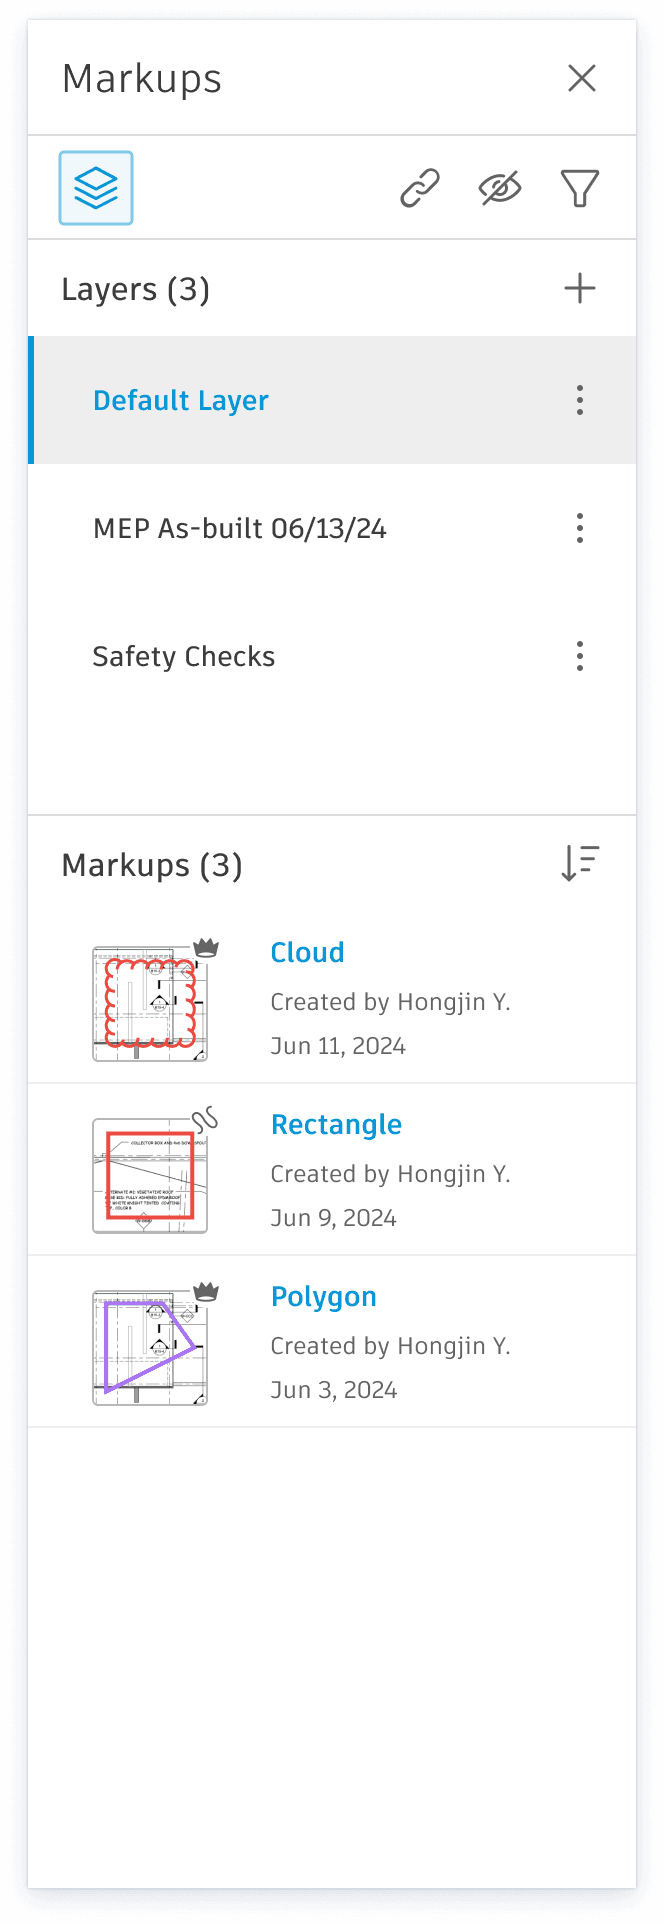
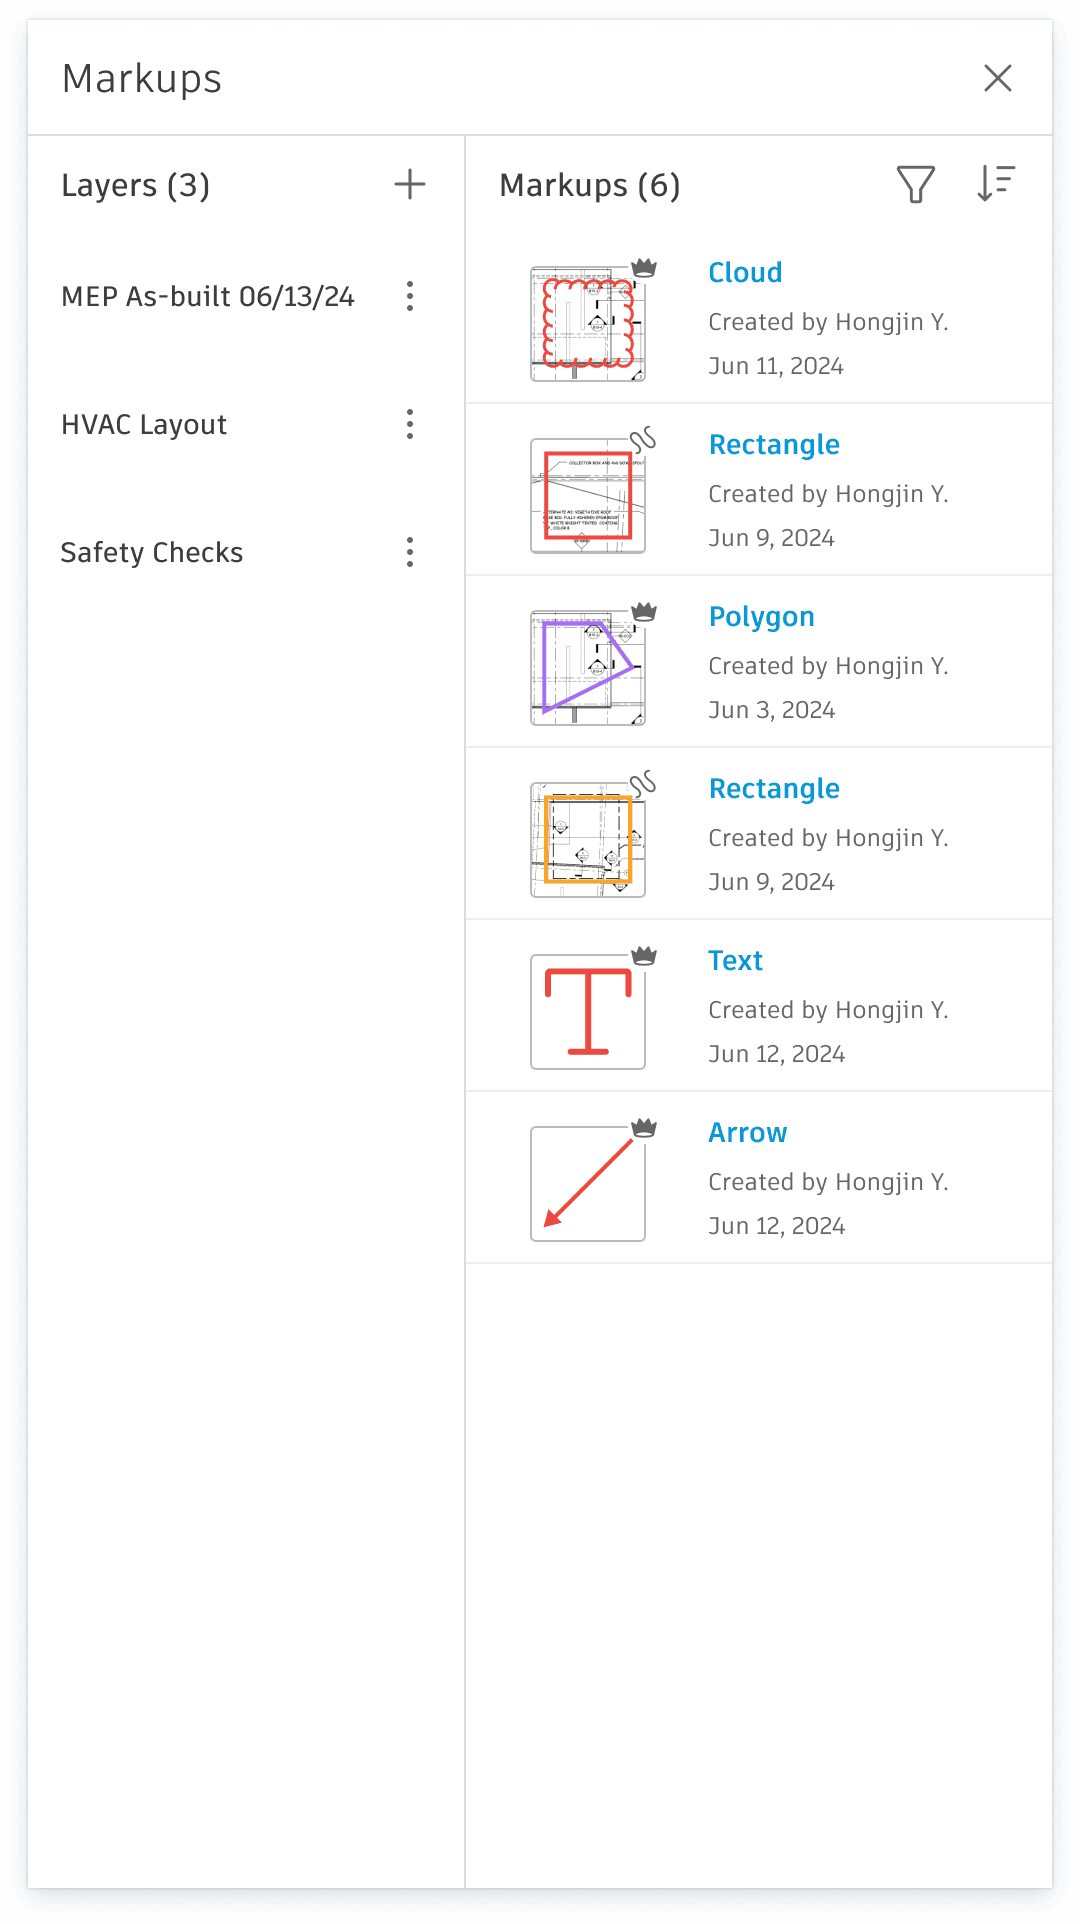
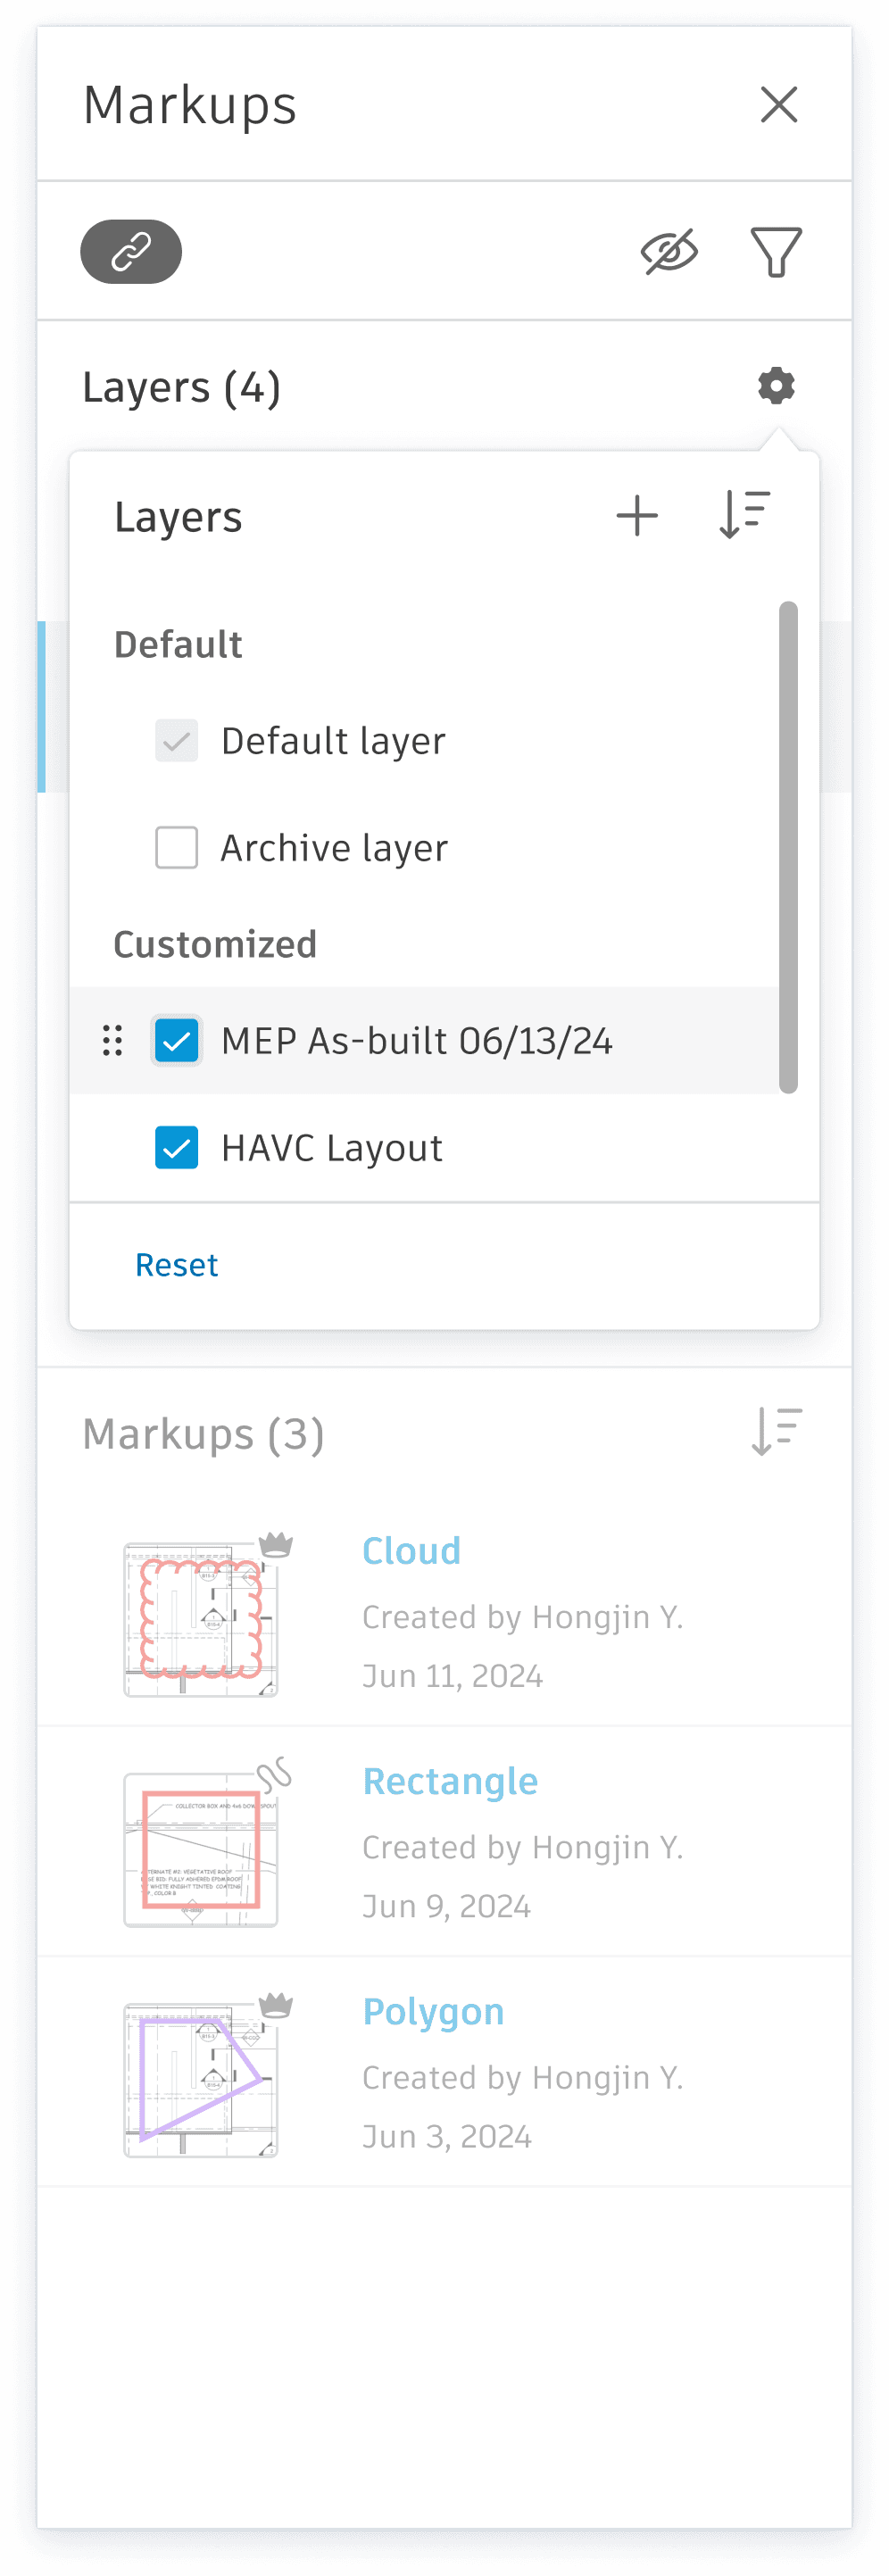
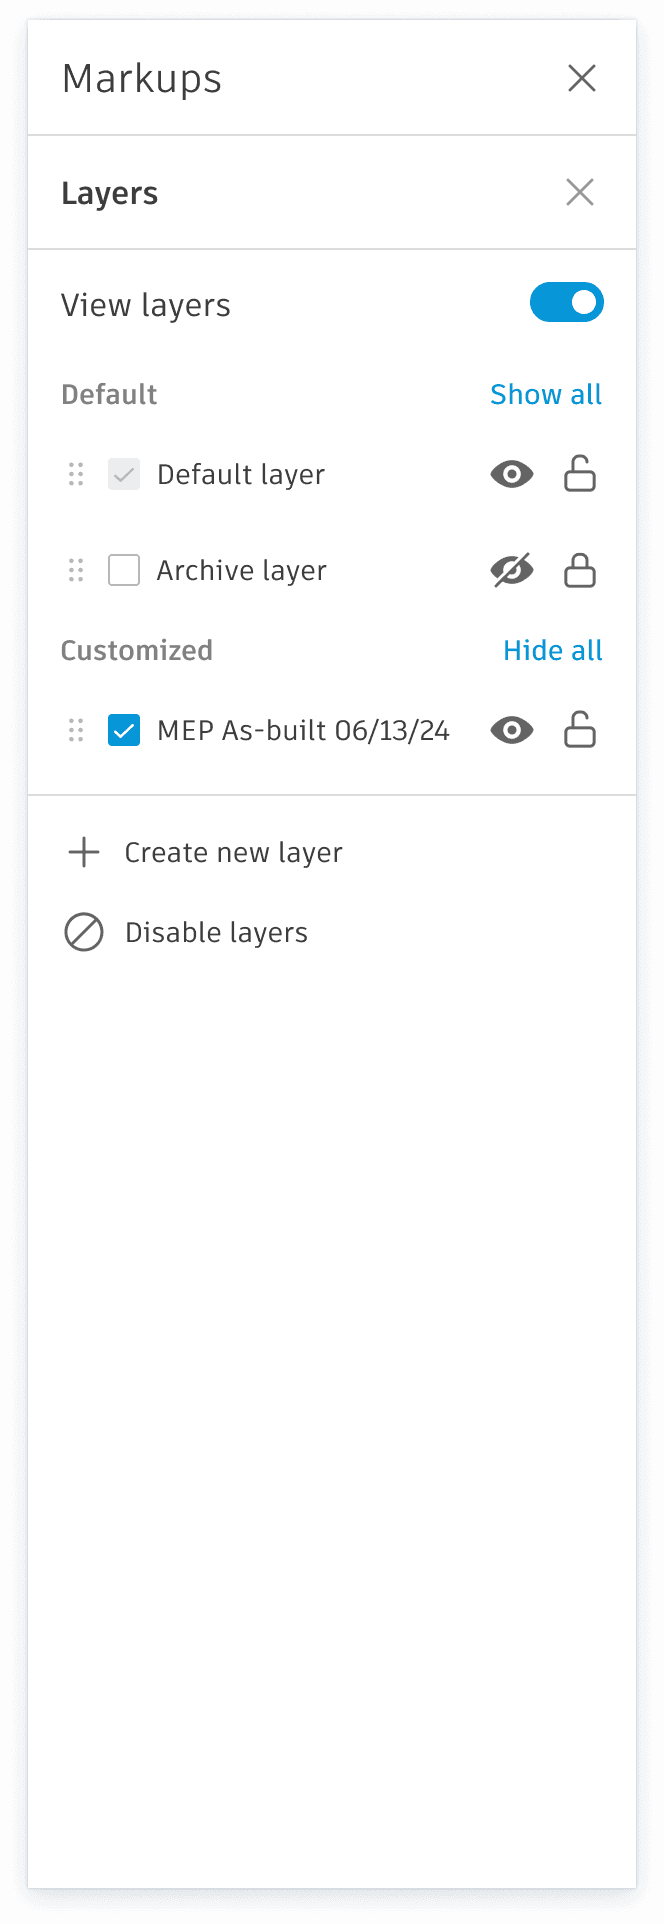
Markups Layer
Autodesk Construction Cloud


Company
Autodesk
Construction Cloud | Build
My Role
Product Intern
Timeline
May-Aug, 2024 | 10 weeks
Responsabilities
Concept Design
Preliminary Research
Prototyping
Design Iterations
Customer Interviews
Design Systems
Project Brief
The Markups tool in Autodesk Construction Cloud (ACC) is part of Autodesk Build, a construction management platform, that helps architectural professionals and construction teams annotate drawings, track project changes, and manage project updates. Users rely on different types of markups, such as text annotations, shapes, and issue pins, to document project progress.
This project introduces a new “Layer” feature within the Markups tool to improve markup organization and management on drawings, largely improving user workflow efficiency.
I led the design of this feature from 0 to 1 during my internship, developing a solution that effectively meets user needs and business goals while laying the groundwork for future iterations and enhancements before launch.
Problem
01
Current Challenge
Currently, as projects scale, organizing and managing large volumes of markups across different phases becomes increasingly challenging. Users needs to work with various types of markups in their daily workflows for different project phases or purpose. However, the current solution of using color-coded filters is unsustainable and inefficient, especially with numerous markups on sheets.
Example of markup clutter (click image to expand)


User Pain Points
1. Manage diverse markups
Large volumes of markups create cluttered views and slow loading times, making it difficult to keep track of critical annotations.
“You've just puked a rainbow onto a drawing."
2. Disconnected workflows
Markups are siloed from other workflows, making it hard to overlay and view different information simultaneously.
"... markups and all these different views that can't be overlaid or viewed ... creates silos and confusion.”
3. Lack of layer feature
The absence of a layer feature hinders migration from PlanGrid (Autodesk acquired) and impacts workflow efficiency.
"The functionality of the layers in PlanGrid, we loved… We then moved over to Build and we no longer had that."
4. Unsustainable markups filter
Current color-coded filter system isn't sticky across drawings and relies on limited palettes, making it inefficient in larger projects.
"It filters right, as soon as you exit out of it and you go back into it ... you have to redo the filter.”
High Level Goals
01 Business Goals
◆
Close competitive gap with competing softwares and improve user retention.
◆
Facilitate migration for PlanGrid users after Autodesk's acquisition and ensure feature parity.
02 Design Goals
◆
Integrate seamlessly with existing workflows and information architecture.
◆
Ensure flexibility and simplicity while giving users full control with a minimal learning curve.
Research
02
Target user group
To understand how the new Layer feature can support real-world workflows, I mapped how different roles interact with markups across project phases to identify where layers could bring the most value. The table below captures these scenarios and helped surface key opportunities for the feature’s design. In summary, layers support four main areas: trades, work phases, visibility control, and as-built documentation.
Project phase
Stakeholders and layer usage
Use case type
Design
Consultants / Designers
Works on markups on different layers to separate discipline input.
By Trades
Pre-construction
Project Managers
Develop works plans and organize different markups for each phase by layers.
By Phases
Construction
Superintendents
Use layers to monitor progress and isolate updates as they progress through the plan.
By Phases
General Contractors (GC)
Create markups on separate layers by trade, ensuring each team views only relevant information to their scope.
By Trades
Electricians
Create layers for home run, branches, etc. so each install crew can focus on their works. Use separate layers for each panel’s circuits, and reorder them to control visual depth.
By Trades
For Visibility
QA/QC Inspectors
Create layers for the continuous inspection during construction cycle.
For Visibility
Post-construction
Sub-contractors
Hide irrelevant layers and create one for as-built to export a clean document to client.
For Documentation
Competitive analysis
To understand how markup layers are managed in real-world tools, I researched four competitor platforms: Bluebeam, PlanGrid, AutoCAD, and Fieldwire. I focused my analysis on the first two tools that has contrasting approaches to layer control. This analysis helped guide my design decisions on how to balance control and clarity in my own solution.


Bluebeam Revu
Direct competitor
Bluebeam is a widely used markup and collaboration tools in the AEC industry. It offers professional-grade PDF annotation and drawing management.
Strength
Provides a dedicated layer panel for visibility, lock, print, and export. Layers can also be assigned in bulk and saved as reusable configurations.
Weakness
Too many entry points and settings are split across the panel, markup list, and context menus, making the interface hard to understand and use efficiently.


PlanGrid
Indirect competitor
PlanGrid is a construction management platform with features like version control, annotation, and issue tracking on both mobile and desktop.
Strength
Simple interface with easy access to layers through the filter panel. Users can group multiple markups and add them to layers directly.
Weakness
No dedicated panel for managing layers. Users can only control them through filters. Editing or removing layers requires extra steps and is not intuitive.
Key Takeaways
After analyzing different approaches to layer management, I distilled two key principles to guide my design: improving visibility and ensuring intuitive control.
Visibility and Accuracy
Layers should support more than just organization—they help users focus on the right information at the right time. A well-structured layer system improves clarity, adapts to different roles and tasks, and ensures drawings stay clean and accurate during as-built documentation.
Integrated Control
Effective layer management should be built into the markup workflow. Users need to view, group, and edit markups without switching contexts. A good design balances integration with simplicity, making layers clear while keeping their functions distinct and manageable.
Design Question
How might we control and organize markups to support clear sheet visibility and smooth workflows across different roles and project phases?
Ideation
03
Scope for MVP
After talking with my PM and mentor, we aligned on an MVP that covers the three key actions users would need most: adding a layer, moving markups to layers, and archiving. We also decided to support basic visibility controls to keep the workflow manageable.
User Stories & User Flows
#1 - Create Layer

USER STORY 1
As a user, I would like to create a layer, add new markups to the layer, and be able to view the new markups through it.
◆ What should be the process of creating layers?
◆ How can users name or organize created layer?
◆ What feedback should users receive upon creating a layer?
#2 - Move Markups to layers

USER STORY 2
As a user, I would like to move existing markups to specific layers, including the ability to move multiple markups at once.
◆ What should be the process of selecting and moving markups to layers?
◆ What options should be provided when user move markups?
◆ What feedback should users receive upon moving a markup's layer successfully?
#3 - Archive Markups

USER STORY 3
As a user, I would like to archive markups and organize them using different layers.
◆ What should be the process of archiving and retrieving markups from layer?
◆ Where should the archive layer be located?
◆ What properties should archive layer have?
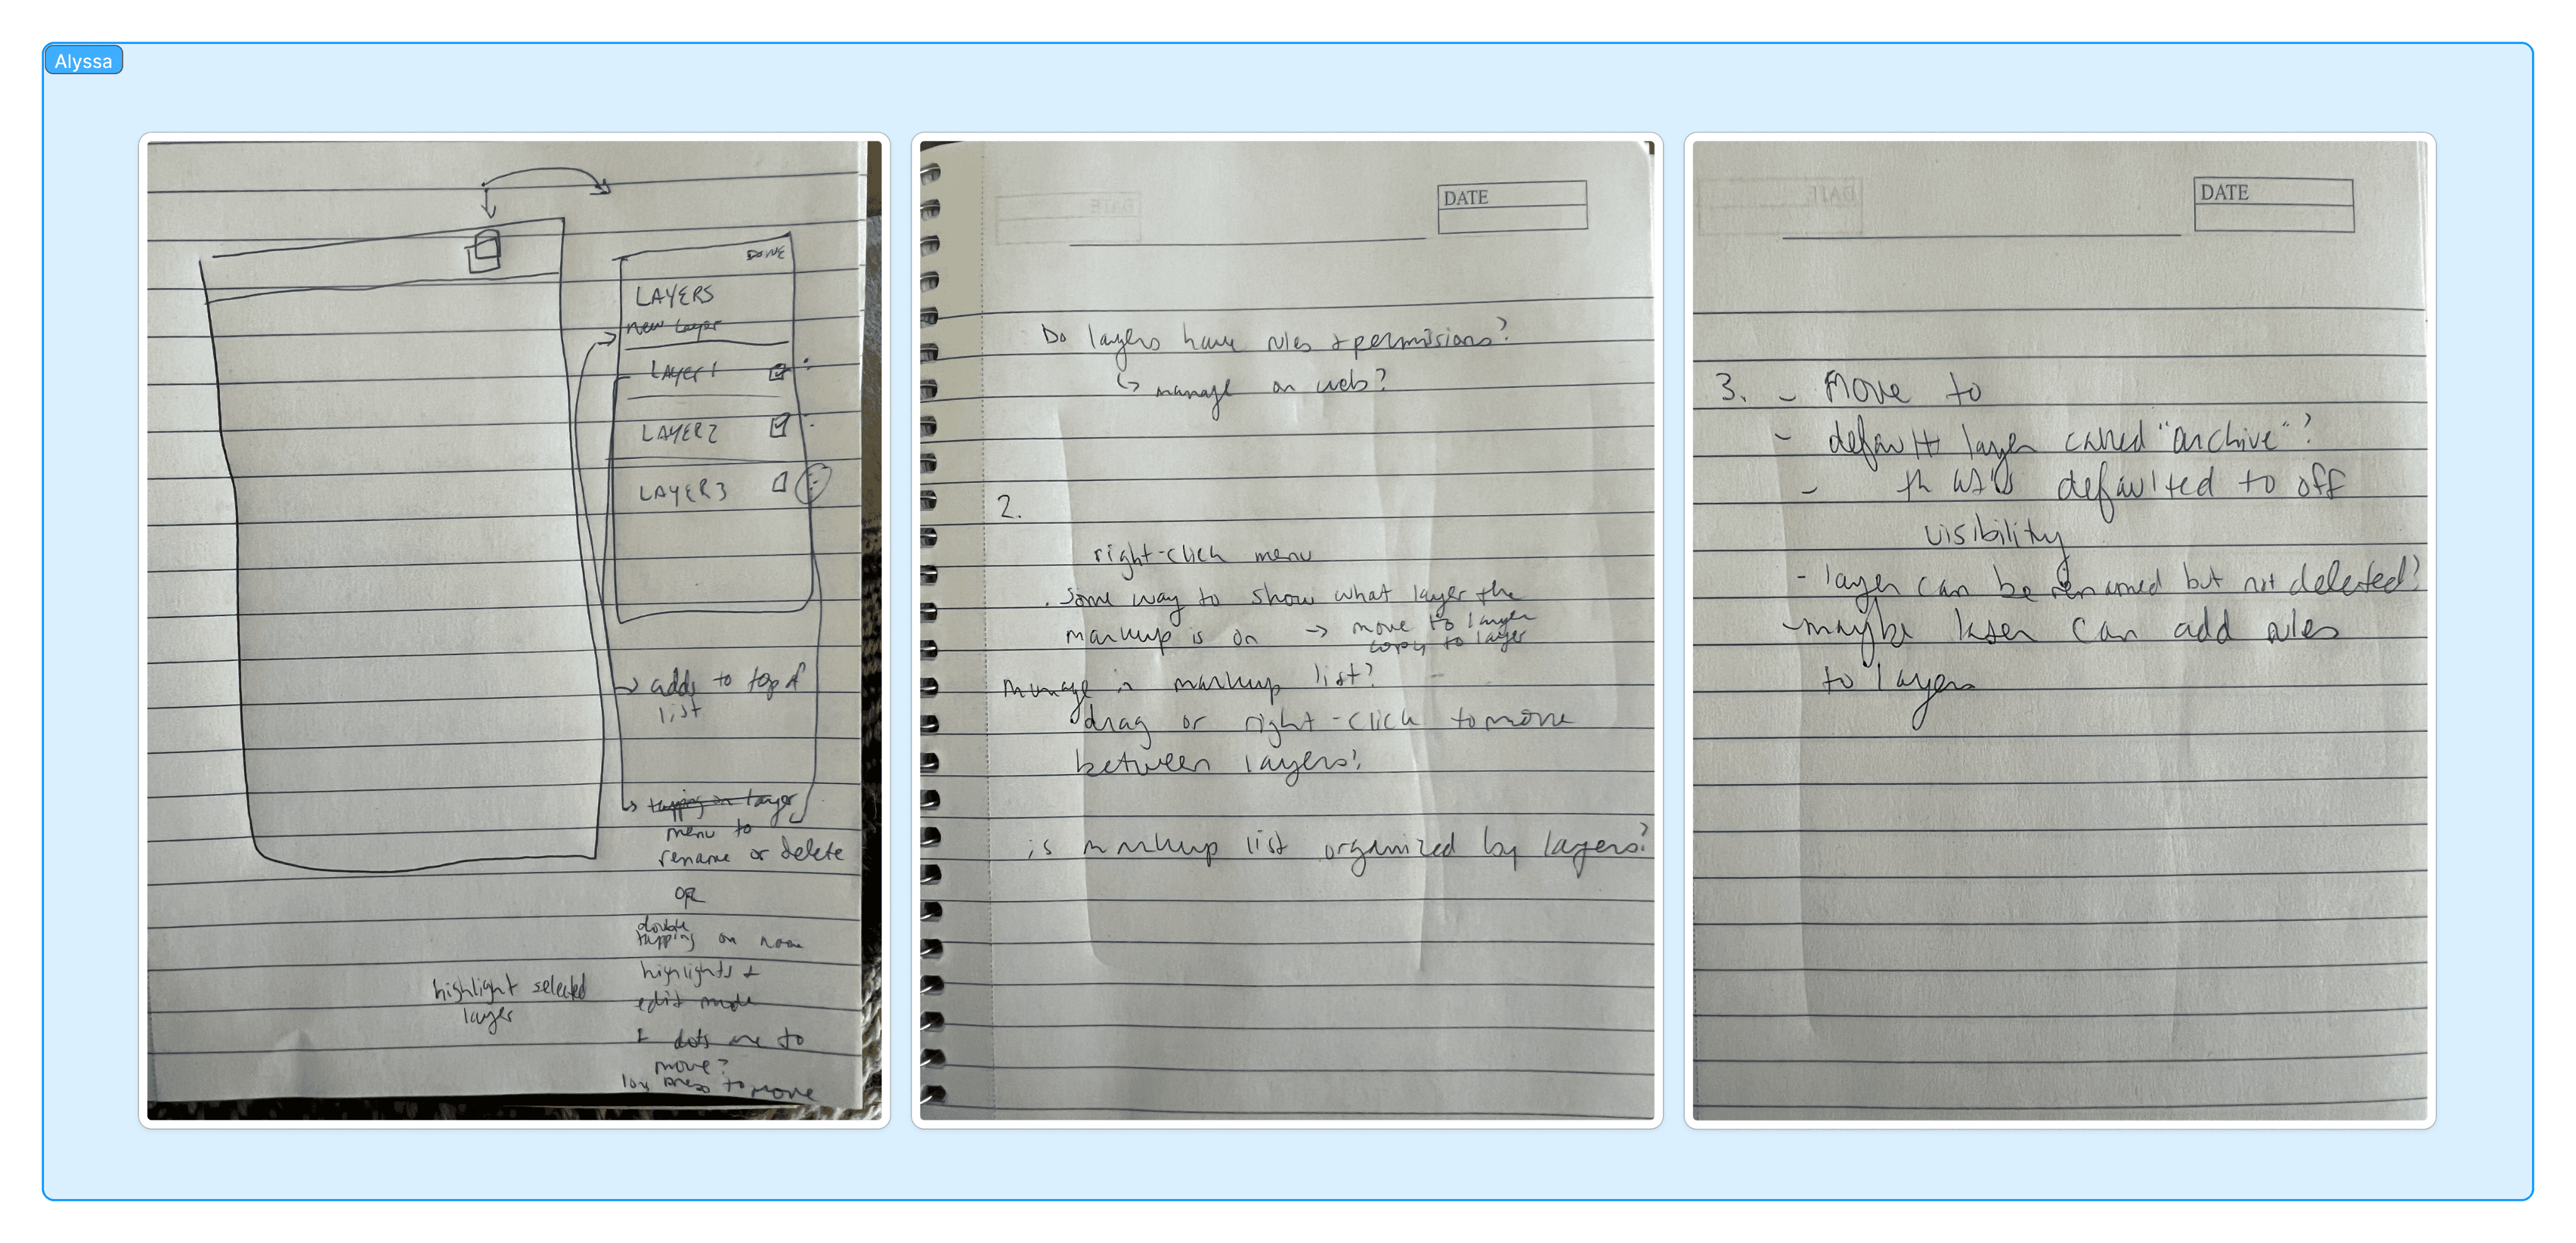
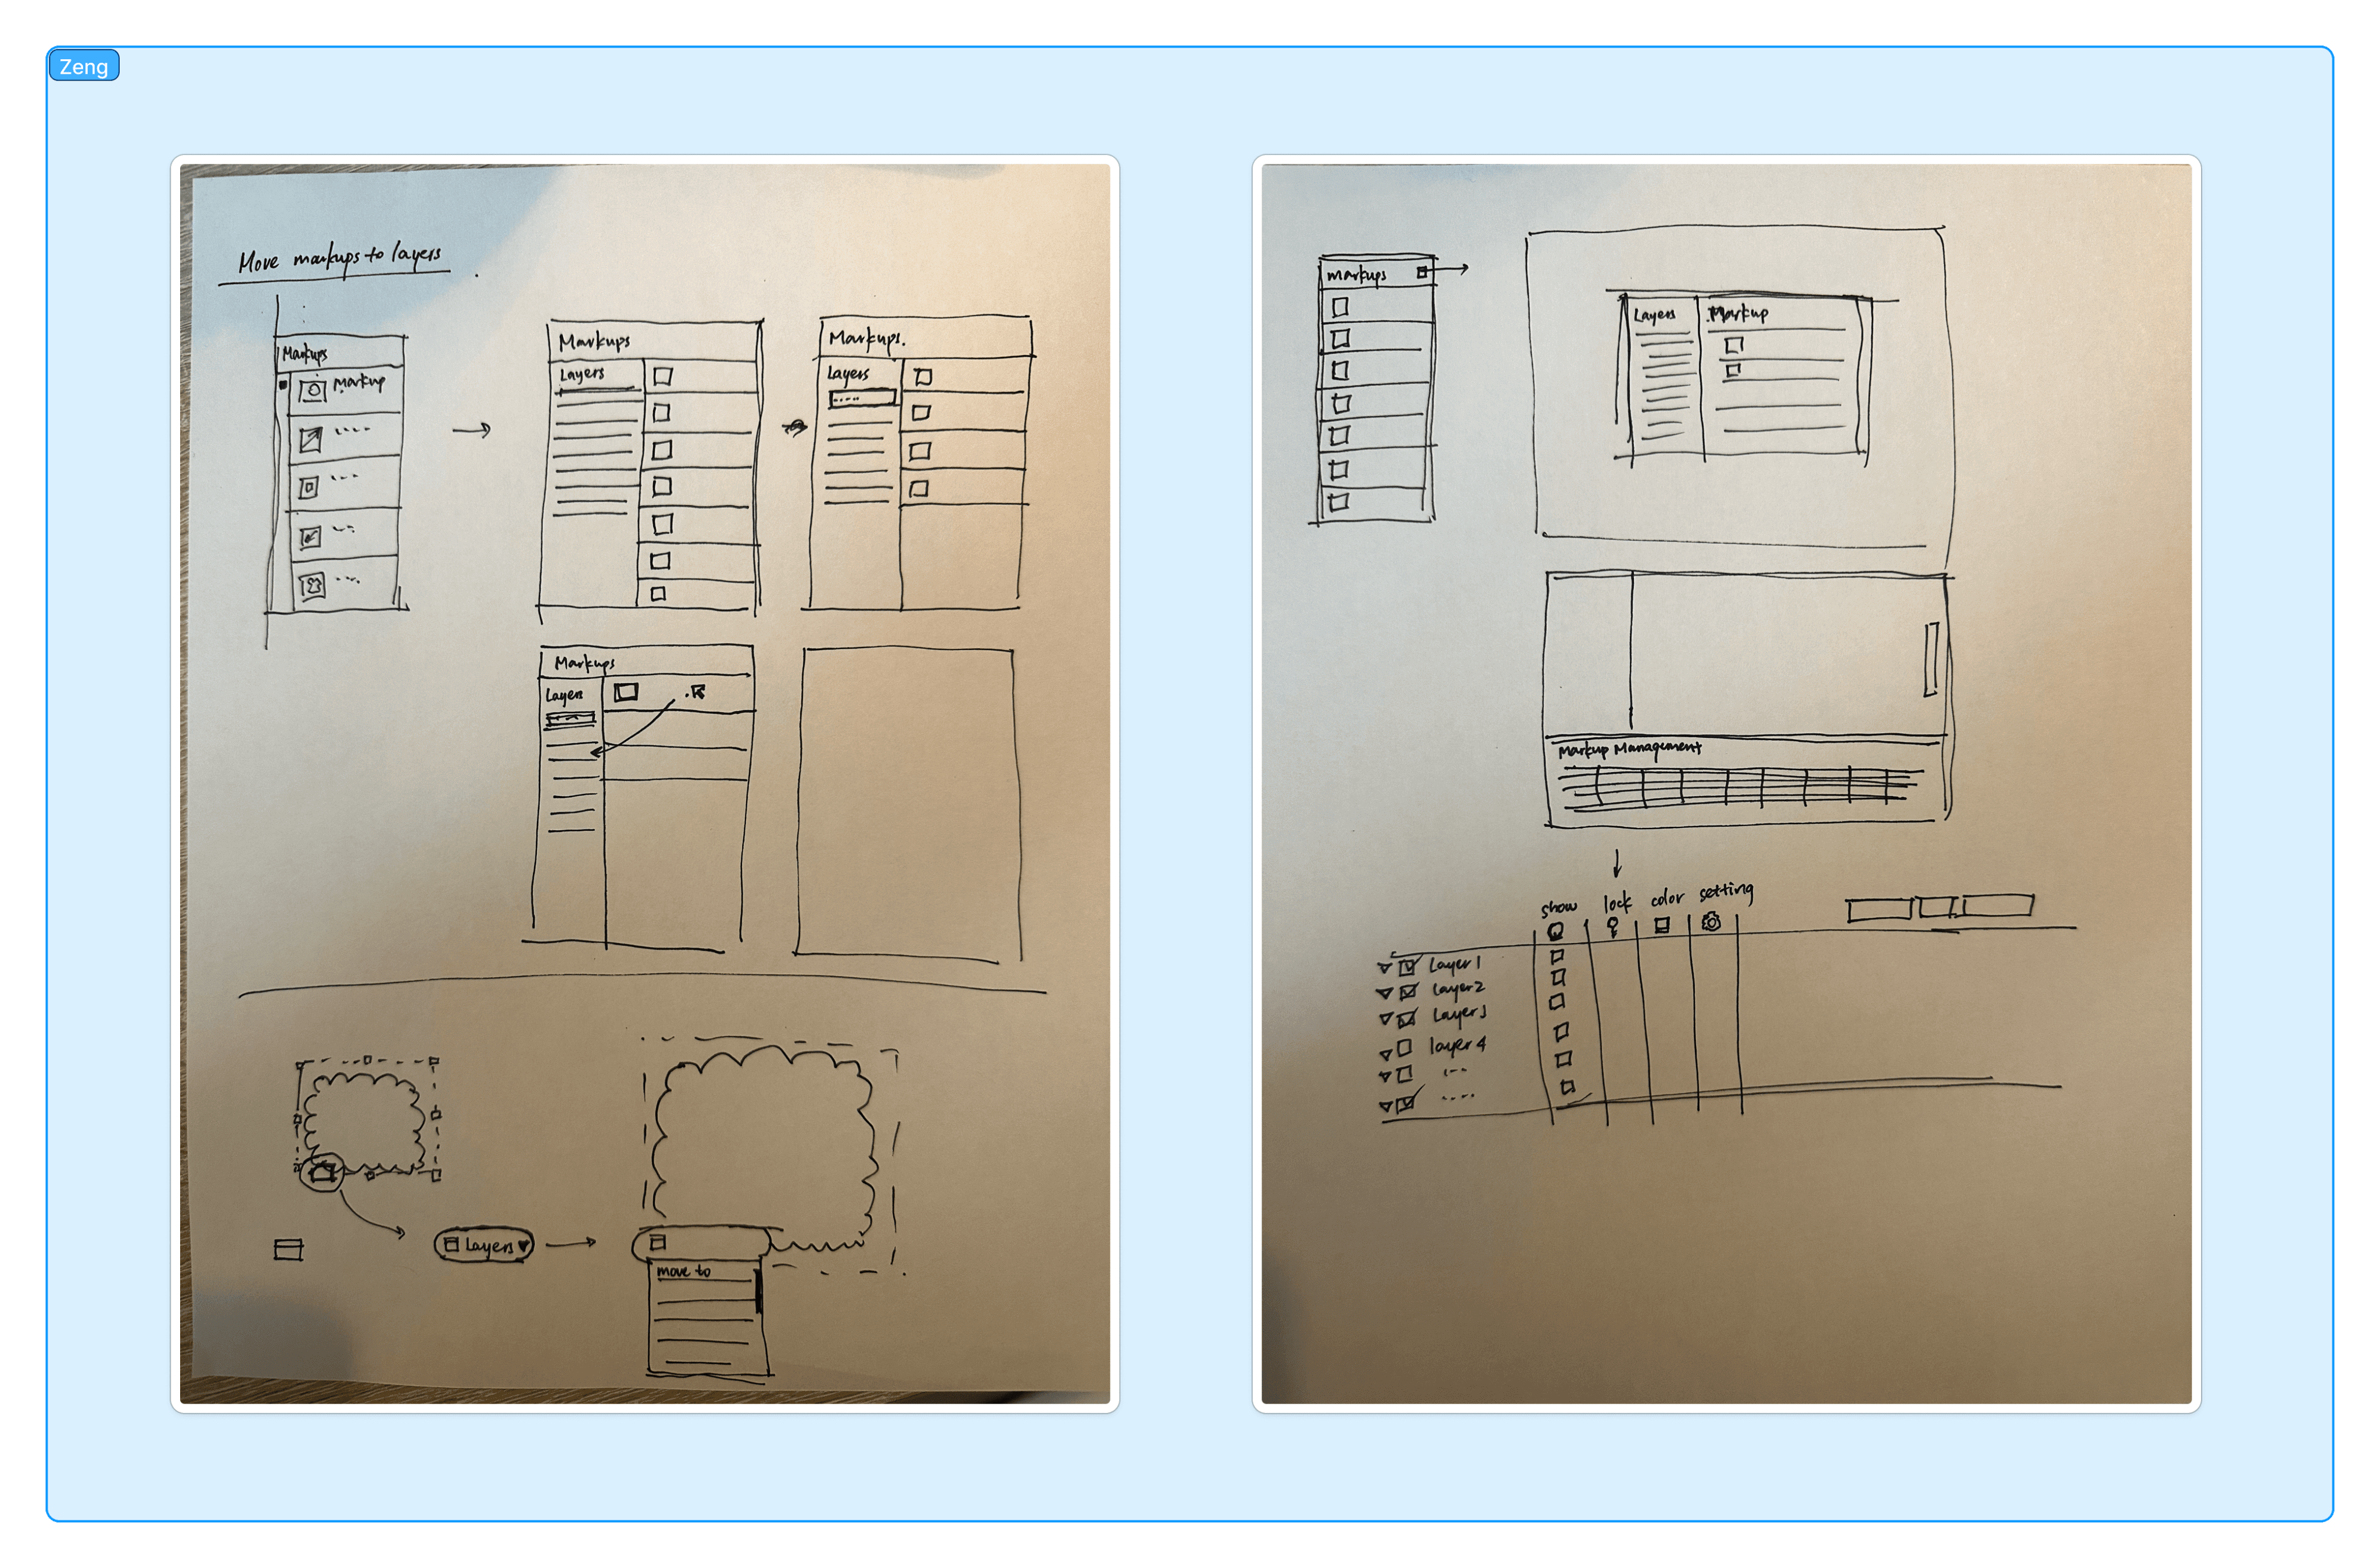
Co-design Workshop
I hosted a 60‑minute co‑design session with our PM, two engineer managers, one design manager, and another designer to test the draft user flows and collect quick UI ideas for the new Layer panel.
What we did?
We walked through each flow in FigJam, sketched alternatives on sticky notes, and voted on pain points and must‑have controls.
What's the result?
The session exposed some edge cases — bulk move, archived‑layer visibility, and permission locks — which I carried into the next prototype round.


Design Manager

Designer
PM
Engineer Manager
Design Manager

Move advanced settings to a kebab menu; flag bulk-move and archived-layer cases for next prototype.
Put core layer actions: add / delete / rename / filter in the Markup List header.
Key Takeaways
Based on what we learned from reviewing flows and co-designing with the team, I set two main goals for the layer experience.
Balance Control and Clarity
The layer system should offer enough control for managing markups, like visibility, grouping, and editing, without adding complexity. Core actions need to be easy to access, while keeping the interface clean.
Support Diverse Workflow Roles
The system should work for different team members, whether they’re adding markups, reviewing drawings, or organizing data. Key actions need to be accessible in context, while advanced controls stay out of the way.
Prototyping & Validation
03
Design Exploration
Here is a diagram that shows the potential use cases for layers across the various phases of a construction project. We’ve highlighted how different stakeholders might use layers to address four main areas: trades, work phases, visibility control, and as-built documentation.
CHALLENGE 1
Make Layer Visually Distinct
To introduce Layers into the Markup List, we needed to make them clearly stand out as a separate object type. Since both layers and markups now appear together, I focused on using visual cues like color, indentation, and icons to help users quickly tell them apart. This visual foundation made it easier to design interactions like visibility toggles and lock controls later on.
Deeper look of the Layer design spec
CHALLENGE 2
Layer Panel Structure
Designing the panel structure was a key challenge. I explored three layouts to balance clarity and scalability. The drawer-style option grouped markups under each layer but can get cluttered with more layers. Splitting layers and markups into two sections made controls clearer but weakened the visual connection. A two-column layout helped restore that link but took up too much space. Each option revealed different trade-offs around clarity and screen real estate.
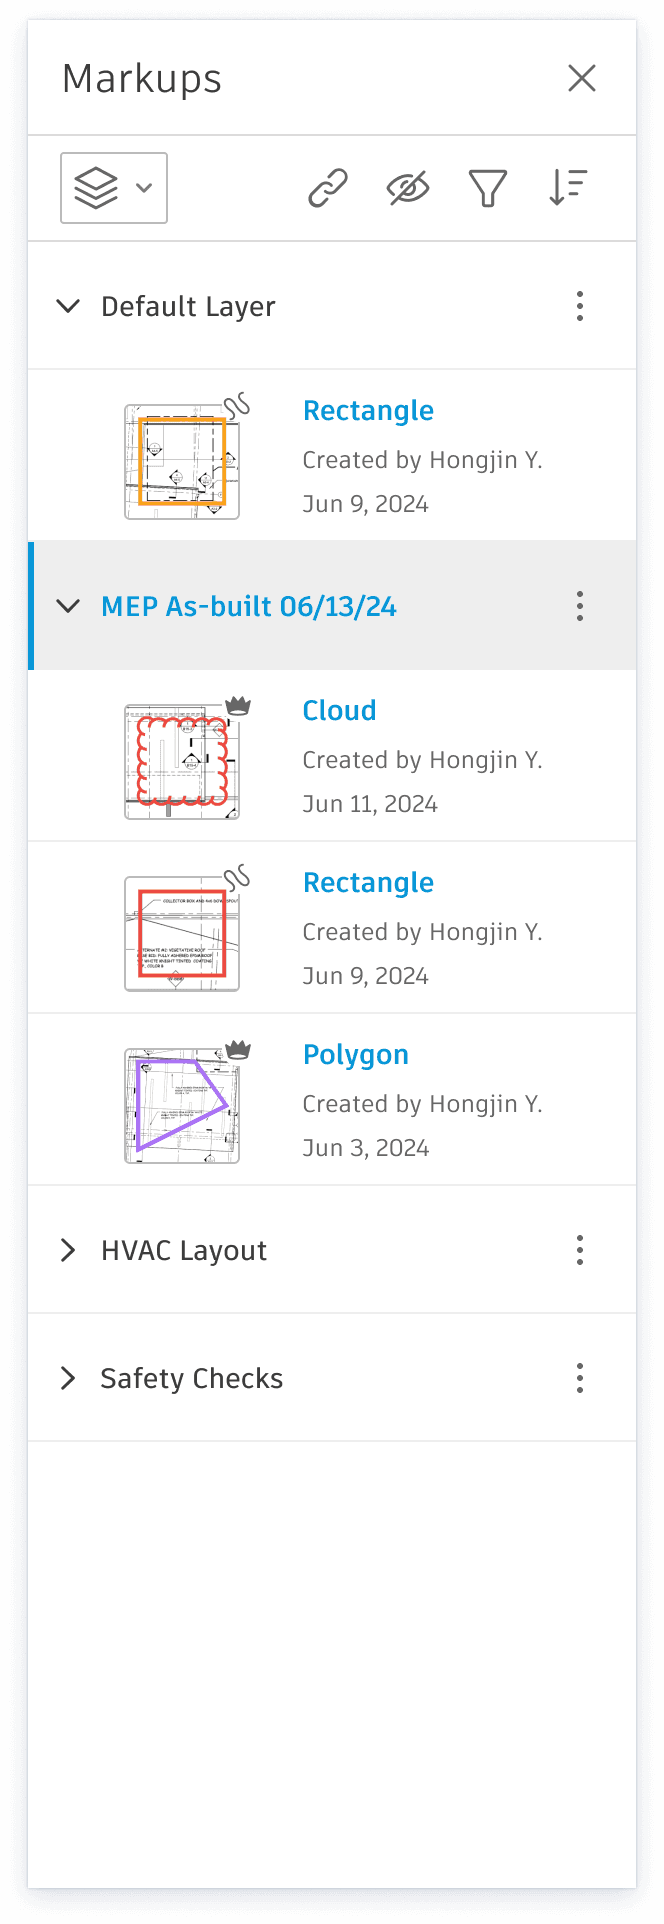
Option 1
Option 2
Option 3
CHALLENGE 3
Header Menu
The header menu controls how users interact with layers. I explored ways to keep it lightweight while supporting advanced actions like toggling visibility, locking layers, and searching. One idea was to let users turn the entire layer system on or off, keeping the interface clean for those who don’t use it.

Option 1
Option 3
CHALLENGE 4
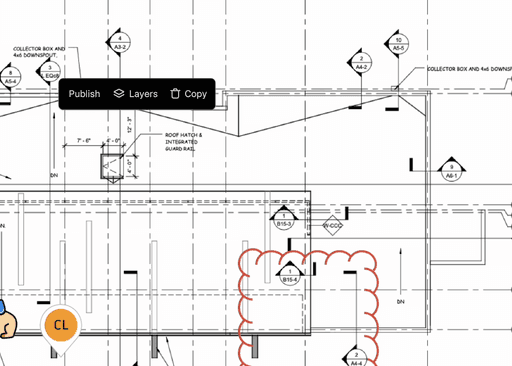
Contextual Menu
To support quick actions without opening the sidebar, I designed a contextual menu that appears directly on the drawing. It lets users move markups to layers in fewer steps, staying focused on the canvas. The layout follows existing interaction patterns to feel consistent and easy to adopt.

User Testings & Interviews
We conducted 6 rounds of feedback sessions, including 4 with end-users. While many design directions were validated, there were still mixed opinions especially around the structure of the layer panel. For example, users were split between grouped and separated layer layouts. Some features like archive and layer-filter interaction were confirmed as useful, while others like permission control and markup integration revealed deeper system-level challenges we couldn’t fully resolve in this round.
6
rounds of interviews
4
/
6
with
end-users
8
Pain points identified

Insights & Opportunities
Although not all decisions were finalized, several ideas were clearly valuable and worth carrying forward. Based on user feedback, I identified four areas for future improvement.
User Workflows
Continue gathering and refining personas and scenarios that involve markups, to make sure the layer system supports real-world roles and tasks.
Markup Integration
Improve how layers connect with different types of markups (e.g., issues, assets) so users can manage everything in one place, not just basic drawn elements.
Permission and Locking
Explore more robust permission models for layers, especially for shared workflows. Locking behaviors should align with existing project-level controls.
Visibility Control
Shift from markup-level visibility to a more flexible, layer-based approach. This will give users better control over how information is shown or hidden.
Feature Overview
A breakdown of the key feature flows delivered to the team


4 Main User Flows
Final deliverables introduce four core user flows to support how users organize and manage markups across construction drawings. These include: creating and archiving layers, moving markups between layers, controlling layer and markup visibility, and performing quick actions directly on sheet view. Together, these flows help streamline coordination across trades and project phases.
1
Layer Control
Users can control layers by creating new layers to group related markups or archive outdated ones. This helps organize information by trade, phase, or review status, making drawings easier to read and manage.
Create Layer
+ View markups via layers
+ Create layer on Markups list
+ Add markups on created layer
FLOW 1.1
Archive Layer
+ Archive single markup
+ Manage layer visibility
+ Toggle on Archive Layer
FLOW 1.2
2
Working with Markups
Users can move markups between layers to keep content organized. This helps separate markups by type, team, or status without needing to recreate them.
Move Markups to Layer
+ Move markup to existing layer
+ Move markup to new layer
FLOW 2
3
Manage Layer Properties
Layer properties let users control how layers and markups appear and behave. Users can toggle layer visibility, lock layers to prevent changes, rename or delete them as needed. Markups within layers can also be filtered and sorted, making it easier to focus on specific tasks during review or collaboration.
Layer Visibility
+ Show/hide layers
+ Lock/unlock layers
+ Rename layers
+ Delete layers
FLOW 3.1
Markups Control
+ Filter markups
+ Sort makrups
FLOW 3.2
4
Layer Actions on Sheet View
Users can create layers and move markups without opening the layer panel. This allows for quicker edits directly from the canvas, reducing steps and keeping focus on the drawing.
Creating Layer
+ View markups via layers
+ Create layer on Markups list
+ Add new markup on created layer
FLOW 4.1
Moving Markups
+ View markups via layers
+ Create layer on Markups list
+ Add new markup on created layer
FLOW 4.2